I have the latest Digirig with the Yaesu FT-8xx cords for Digirig Mobile - Combined Cable
I am trying it on my FT-817 and VARA-HF.
Problem is that the PC audio input is totally overloaded.
Even with the USB Microphone input control on zero (yes zero) the VARA-HF is continousely peaking in the red on background noise.
If I Mute the microphone is goes down. (Volume zero and mute are clearly not the same thing…)
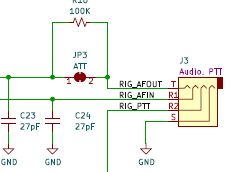
In the diagram I see there is no option to reduce the audio output of the soundcard.
Anybody have any idea why this is not working as expected with all officlal cables etc?
I do have the latest software, and setting the audio to Left only helpt a bit. But still too strong.
The Input attenuator is on the wrong side… I need it on the audio input side, not on the output side…
Are you certain? Please look at the link which contains:
Input Attenuator
Digirig Mobile now features -20dB input level attenuator. If the audio from the transceiver is too high and it can not be adjusted down using the regular level controls, then enable the attenuator by cutting the existing trace between the pads labeled “ATT”.
EDIT: by “side” in my reply below I meant: physical location of the attenuator pads on the PCB not the direction of the audio. In all Digirig Mobile revisions that have attenuator, it is for the audio signal received from the radio into computer. From what you mentioned earlier (e.g. “USB Microphone input control”) it sound like this is what you need. Before you go ahead with the activation of the attenuator, first make sure you unchecked AGC in the input device’s settings.
The updated board has ATT pads on the other side, but the function is the same. Feel free to activate if you need lower the input levels beyond what the the software controls allow.
Yes… The problem for me was that I misunderstood the diagram text.
Somehow I thought RIG_AFOUT was going Out TO the Rig. Of course the text is correct… but for silly people like me maybe two Arrows indicating direction >>> <<< may be better
I will cut that link and get the attenuation.